Enabling UE4's Steam Integration
This is the first step in a series of guides that will show you how to enable the OnlineSubsystemSteam module for your project. It does not cover session creation, session management, app id association, or anything specific to OnlineSubsystemSteam. These steps are the first part in enabling a Steam integration into your Unreal Engine 4 Project whether its Blueprint or C++.
Results
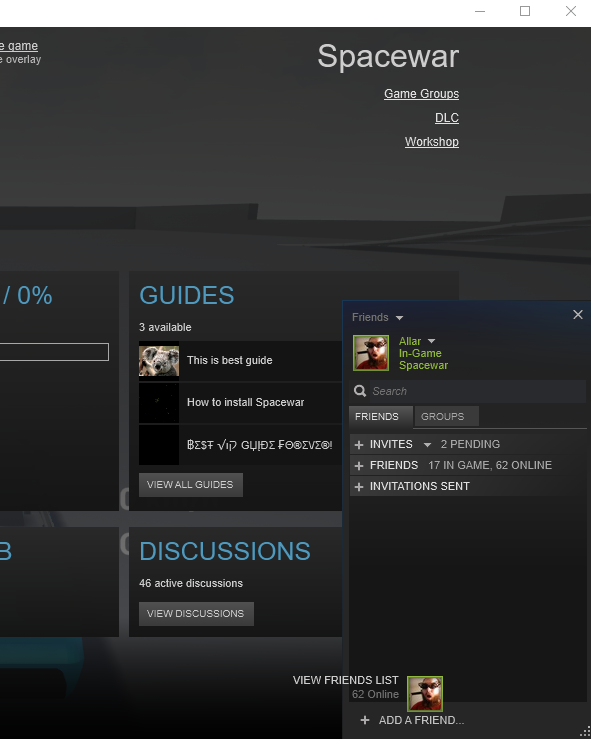
The result of this guide should leave you with a project that has the Steam Overlay working correctly for client builds, with Steam showing you as playing Spacewar. Spacewar is a test game on Steam that everyone owns and eases Steam development.
For Server builds, this covers how to get the server to initialize Steam correctly. This does not set up any session or server list management, however.
If you already have session management working without Steam (i.e. your server browser works on LAN using OnlineSubsystemNull) then your session management logic should also work with Steam.
PLEASE NOTE: By default, Steam sessions are created using 'Steam Presence', what this means is that instead of using Steam's master server list for global server searching, Steam will only return sessions within your Steam region and sometimes sessions related to the people on your friends list. If you enable Steam and are unable to see your buddy's server that happens to be on the other side of Earth, it is not an issue with your configuration but how Epic handles Steam sessions. To correct this, please refer to my GenericPlatformTools plugin. (At the time of this writing, GenericPlatformTools documentation does not exist.)
Warning
Once you enable OnlineSubsystemSteam, testing your multiplayer games locally by having multiple clients run on the same machine will cause all sorts of failures as Steam is very against the idea of running multiple games under the same Steam account simultaneously. Instead, you will have to have multiple machines to test or run your game clients in isolated Virtual Machines.
If you need to test a multiplayer game locally, you should disable Steam by running -nosteam as a command argument or by switching back to OnlineSubsystemNull.
Implementation
All the changes required for basic Steam implementation are done purely in the config files of your project, namely DefaultEngine.ini. To find DefaultEngine.ini, navigate to your project's directory then enter the Config subdirectory. You should see a list of config files including DefaultEngine.ini. Open up this file in a text editor such as (Notepad++)[https://notepad-plus-plus.org/] and make the following changes.
Look For Existing OnlineSubsystem Settings
If you are using an Epic provided template, OnlineSubsystem settings should not exist in your DefaultEngine.ini config. If you are using a project such as GenericShooter, you may have some of these settings already defined.
Look through your config file and see if you can find config sections named [OnlineSubsystem] or [OnlineSubsystemSteam]. If you see these, be sure to change these sections of the config instead of creating new sections as described in the next step.
Creating The OnlineSubSystem Settings
[OnlineSubsystem]
The first batch of settings that we need to add to DefaultEngine.ini is the [OnlineSubsystem] block of settings. These settings here tell the engine what OnlineSubsystem to use for this project. In this case, we are setting it to Steam.
[OnlineSubsystem]
PollingIntervalInMs=20
; Uncomment the following line to use the Null Subsystem
;DefaultPlatformService=Null
; Uncomment the following lines to use the Steam Subsystem
DefaultPlatformService=Steam
VoiceNotificationDelta=0.2
If you don't have an [OnlineSubsystem] block of settings in your config, go ahead and add this to the very top of your config. Otherwise, edit your existing block to look like the one I provided.
The ; character allows you to leave comments in config files. I have left these commented lines in so that if you would like to switch between OnlineSubsystemNull and OnlineSubsystemSteam, you can do so easily.
The VoiceNotificationDelta setting is an Epic recommended default when using Steam, however, I'm not sure of the exact impact of this setting at this time.
[OnlineSubsystemSteam]
Now that we told UE4 to use the Steam Subsystem for your project, we need to configure the OnlineSubsystemSteam module. Just like the setting block above, you will need to add/set these settings in your DefaultEngine.ini file.
[OnlineSubsystemSteam]
bEnabled=true
SteamDevAppId=480
SteamAppId=480
GameServerQueryPort=27015
bRelaunchInSteam=false
GameVersion=1.0.0.0
bVACEnabled=1
bAllowP2PPacketRelay=true
P2PConnectionTimeout=90
; This is to prevent subsystem from reading other achievements that may be defined in parent .ini
Achievement_0_Id=""

[/Script/OnlineSubsystemSteam.SteamNetDriver]
NetConnectionClassName="OnlineSubsystemSteam.SteamNetConnection"
These settings set various specific OnlineSubsystemSteam implementation details, such as what App ID to use, what port to listen for Steam Queries on, and achievement data. (At the time of this writing, my tutorials for the details about these settings such as Achievements is not written yet, but please check back soon.)
If you have your own Steam App ID, replace 480 above with your App ID.
[/Script/Engine.Engine]
The last batch of settings we need to add to the DefaultEngine.ini config file is very likely to already exist in your current config. Search your config for a [/Script/Engine.Engine] section as that will be where we are making our changes. If this section absolutely does not exist in your DefaultEngine.ini files, please create it.
Once you find your [/Script/Engine.Engine] config section, remove any line that contains the word NetDriverDefinitions. We will be adding our own. Leave any other line in this section intact.
These are the settings you need to apply to your [/Script/Engine.Engine]:
[/Script/Engine.Engine]
!NetDriverDefinitions=ClearArray
; Uncomment the next line if you are using the Null Subsystem
;-NetDriverDefinitions=(DefName="GameNetDriver",DriverClassName="/Script/OnlineSubsystemUtils.IpNetDriver",DriverClassNameFallback="/Script/OnlineSubsystemUtils.IpNetDriver")
; Uncomment the next line if you are using the Steam Subsystem
+NetDriverDefinitions=(DefName="GameNetDriver",DriverClassName="OnlineSubsystemSteam.SteamNetDriver",DriverClassNameFallback="OnlineSubsystemUtils.IpNetDriver")
Once again, it is important that you remove any old NetDriverDefinitions settings and add these settings to the [/Script/Engine.Engine] block, but do not change any other settings you may have in this block. For example, if you are integrating Steam into the Vehicle Template, your final result would look like:
[/Script/Engine.Engine]
+ActiveGameNameRedirects=(OldGameName="TP_VehicleBP",NewGameName="/Script/ProjectName")
+ActiveGameNameRedirects=(OldGameName="/Script/TP_VehicleBP",NewGameName="/Script/ProjectName")
!NetDriverDefinitions=ClearArray
; Uncomment the next line if you are using the Null Subsystem
;-NetDriverDefinitions=(DefName="GameNetDriver",DriverClassName="/Script/OnlineSubsystemUtils.IpNetDriver",DriverClassNameFallback="/Script/OnlineSubsystemUtils.IpNetDriver")
; Uncomment the next line if you are using the Steam Subsystem
+NetDriverDefinitions=(DefName="GameNetDriver",DriverClassName="OnlineSubsystemSteam.SteamNetDriver",DriverClassNameFallback="OnlineSubsystemUtils.IpNetDriver")
These NetDriverDefinitions tell UE4 to use the Steam networking layer instead of the raw operating system based networking layer. This is important as Steam relies on this networking layer for better session management, voice, and packet relays.
Linking The OnlineSubsystemSteam Module
This section applies to C++ projects only. If you are working on a Blueprint only project, skip down to Testing Your Steam Implementation. If you want to convert your Blueprint project to a C++ project, check out this guide.
All the changes required on the code side of your C++ project for UE4's Steam Integration will take place in your project's Target.cs and Build.cs files. You can find these files in your Project's Source folder. Please note that the filenames of your Target.cs files will be named after your project name and will be different than mine here.
Project.Target.cs
Find your Project.Target.cs file in your Project's Source folder, replacing the Project in this example filename with the name of your project.
In this file you should see a constructor function that looks like this:
public GenericShooterTarget(TargetInfo Target)
{
	Type = TargetType.Game;
    // Ensure that we compile with the Steam OSS
    UEBuildConfiguration.bCompileSteamOSS = true;
}
You'll see that in my version I have added the last two lines in this function after Type = TargetType.Game, you'll need to do the same. What this does is it tells the Unreal Build Tool that it needs to compile the Steam modules for this project's build target.
ProjectServer.Target.cs
If you have dedicated server support for your project, you should also have a ProjectServer.Target.cs file. If you don't have dedicated server support and would like to enable it, please follow the tutorial I have written here.
If you don't need dedicated server support, simply skip this section and continue with Project.Build.cs.
The code change that we're making here is identical to the last section, and all we're doing is adding UEBuildConfiguration.bCompileSteamOSS = true; to our build target. The only difference is this time we're adding it after Type = TargetType.Server; instead of Type = TargetType.Game;.
public GenericShooterServerTarget(TargetInfo Target)
{
    Type = TargetType.Server;
    // Ensure that we compile with the Steam OSS
    UEBuildConfiguration.bCompileSteamOSS = true;
}
Project.Build.cs
Within your Project's Source folder, you should see a folder also with the name of your Project. Navigate to this folder and you should find a Project.Build.cs file. This file tells the Unreal Build Tool what modules your project depends on. We will need to add the OnlineSubsystemSteam module to its dependency list.
If you are using a C++ template or converted your Blueprint project to C++, you may already have the code needed but commented out. If so, replace that code with the code provided here.
using UnrealBuildTool;

public class GenericShooter : ModuleRules
{
	public GenericShooter(TargetInfo Target)
	{
		PublicDependencyModuleNames.AddRange(new string[] { "Core", "CoreUObject", "Engine", "InputCore" });

		PrivateDependencyModuleNames.AddRange(new string[] {  });

        // Uncomment if you are using Slate UI
        // PrivateDependencyModuleNames.AddRange(new string[] { "Slate", "SlateCore" });

        // BEGIN STEAM INTEGRATION

        // Uncomment if you are using online features
        PrivateDependencyModuleNames.Add("OnlineSubsystem");
        PrivateDependencyModuleNames.Add("OnlineSubsystemNull");
        if ((Target.Platform == UnrealTargetPlatform.Win32) || (Target.Platform == UnrealTargetPlatform.Win64) || (Target.Platform == UnrealTargetPlatform.Linux))
        {
            if (UEBuildConfiguration.bCompileSteamOSS == true)
            {
                DynamicallyLoadedModuleNames.Add("OnlineSubsystemSteam");
            }
        }

        // END STEAM INTEGRATION
    }
}
In the snippet above, the relevant code is the block between the // STEAM INTEGRATION tags. In this code, you will see that we're adding the OnlineSubsystem, OnlineSubsystemNull, and OnlineSubsystemSteam modules to our projects dependency list.
It is important to wrap the OnlineSubsystemSteam module addition in a platform check as if you build for multiple platforms such as console or mobile, you will find that you'll get a lot of compile and linker errors as the OnlineSubsystemSteam module is not supported on those platforms.
Re-compile Your C++ Project
Now that you have made these code changes, you will have to regenerate and recompile your project. If you are unfamiliar with this, please read Epic's documentation on building a C++ project or read my earlier tutorial on how to convert a Blueprint project to C++.
Note About Dedicated Server Support
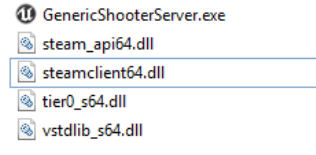
At the time of this writing using Unreal Engine 4.10, there is an issue with how dedicated servers for C++ projects find the Steam shared library files. If you cook and run a dedicated server after the above steps, Steam initialization may fail.
You may have to apply these Steam fixes every time you cook a new server build if your server deployments remove the resulting steamclient.so file from this fix.
Windows Dedicated Server Steam Fix
This workaround is fairly simple. To get a Windows dedicated server to properly load Steam, you need to place a copy of all the files within your Engine\Binaries\ThirdParty\Steamworks\Steamv132\Win64 folder into your Project's Binaries\Win64 folder such as that these files are side-by-side with ProjectServer.exe.
Linux Dedicated Server Steam Fix
Similar to the Windows Dedicated Server fix, we need to place a Steam shared library side-by-side with our Linux server executable. This is a bit harder to do though as Epic does not provide a Linux Steam shared library, specifically steamclient.so. Because of this, we will have to grab our own copy.
The easiest way to do this is to use the SteamCMD client on a Linux host. To install SteamCMD, you can either follow the guide on Valve's Wiki or try this condensed form:
cd ~
mkdir steamcmd
cd steamcmd
sudo apt-get install lib32stdc++6
wget https://steamcdn-a.akamaihd.net/client/installer/steamcmd_linux.tar.gz
tar -xvzf steamcmd_linux.tar.gz
./steamcmd.sh
This will download, extract, and run the SteamCMD client. After these commands, you should be prompted with a Steam> shell.
Depending on if your Linux host is 32-bit or 64-bit, follow the appropriate section.
Linux 32-bit Steam Shared Library
At this point, you already should have the 32-bit Linux Steam Shared Library required to run your game. You can close SteamCMD running the command exit.
The 32-bit Steam Shared Library, steamclient.so, is located in your ~/steamcmd/linux32 folder. Simply copy this steamclient.so file so that a copy of it exists side by side with your Project's Linux server binary, for example, inside GenericShooter/Binaries/Linux. Your Linux dedicated server should now initialize Steam correctly.
Linux 64-bit Steam Shared Library
If your Linux host is 64-bit, a bit more work is required. The SteamCMD program only comes with a 32-bit Linux shared library by default, so you will have to force a download of the 64-bit dedicated server redistributables. To do so, you should still be in your Steam> shell. If not, simply run ./steamcmd.sh again.
In your Steam shell, run the following:
login anonymous
app_update 1007
exit
This will tell Steam to download the Steam SDK Redistributables, which includes the 64-bit Linux Steam shared library. After running the above, you can find the 64-bit Linux Steam shared library, steamclient.so, inside ~/Steam/steamapps/common/Steamworks SDK Redist/linux64/. Simply copy this steamclient.so file so that a copy of it exists side by side with your Project's Linux server binary, for example, inside GenericShooter/Binaries/Linux. Your Linux dedicated server should now initialize Steam correctly.
Testing Your Steam Implementation
Running your project within the UE4 Editor will not load the Steam Subsystem. In order to test your Steam implementation, you will need to run your game as either a Standalone game or as a cooked WindowsNoEditor game. Once you do, Steam should allow you to use its overlay by pressing Shift+Tab and if you are using the settings I provided, it should list you as playing SpaceWar, as shown in this picture.