Beginning Your Game Part 1
IMPORTANT: Use the March build of UDK
These beginning 4 tutorials got screwed over in a Feb/March mixup. These first two used Feb while the rest of this entire site uses March.
You will get a few warnings when following the first two parts, but there isn't too much code here. It will begin working fully after parts 3 and 4.
If you can make it past 4, these tutorials are pretty solid and will be a hell of a lot easier.
I'll try to remake these first tutorials soon.
Video Version
Subject: Beginning Your Game Parts 1 and 2
Skill Level: Beginner
Run-Time: 1 Hour
Author: Michael Allar
Notes: This is really incredibly long but goes over how to create a blank slate for your game. Also goes somewhat in-depth on a line-by-line basis.
Download: Low-Res (66MB) Hi-Res (200MB)
Written Version
Subject: Beginning Your Game Part 1
Skill Level: Beginner
Author: Michael Allar
Notes: Gets your UDK set up so that you can start coding into your own game class!
If you haven’t already, you need to install a fresh copy of Epic’s Unreal Development Kit (UDK). Without it, you can’t really build anything.
You also need a way to edit .ini and .uc files. Notepad will work, but I strongly recommend setting up nFringe or Notepad++.
It is highly recommended that you also set up UnCodeX.
At the time of this writing, the UDK version used is UDK-2009-12.
Setting Up Your Code Package
In order to begin coding your new game, you first have to put your code somewhere where the Unreal Engine can find it. This is where the DevelopmentSrc folder comes into play. All the code for your game belongs in the DevelopmentSrc folder, and your code that **you **will create will be in a folder with a meaningful name that represents your game. Each folder in DevelopmentSrc is a script package, so we call GameFramework, UTGame, UTGameContent, etc "script packages". In each script package there is a folder within labeled "Classes" where all your UnrealScript classes will go. UnrealScript Classes are how you extend functionality to your game, making it your own. There lies a folder upon installation in Src named MyMod, you may use this folder to place your code in but I highly recommend naming it similar to your game name but keep in mind that you shouldn't use spaces or weird characters in your package name as it will have to be referenced in code many times. You will see that for this tutorial, I have used "UDKGame" as my script package name. Inside this MyModClasses folder you will find a DO_NOT_DELETE.txt, but feel free to delete this. It seems that this file was only needed for Epic to package the installer correctly. Right now this script package is empty, so lets get ready to add to it!
Currently Your Game is UTDeathmatch
After installing the UDK, if you launch your game through your Unreal Frontend (located in Binaries, I highly recommend keeping this open at all times for convenience) you will load a level with a UI interface that allows you to begin a game. If you load any other map (the default is UTFrontend), you will see that your game will load Epic's UTDeathmatch game mode. (unless the map you load has a CTF- or VCTF- prefix, but we will go into how that works later) We don't want to play UTDeathmatch, we want to play our own game mode! In order to do this, we have to first create our own game mode and then make the engine use our game mode.
What Makes A Game Mode?
A game mode in the Unreal Engine is a set of rules in code that define game play. Game modes are implemented through GameInfo classes. (Actor.Info.GameInfo) For a more in-depth explanation of this and how one was supposed to figure this out, watch the video version of this tutorial. Derived from this GameInfo class is UTGameInfo, the superclass of all game modes that you have seen in Unreal Tournament including Deathmatch, Capture The Flag, etc. Here is where you must make an important decision regarding the development of your game: You can either derive your game mode from either GameInfo or UTGameInfo. Deriving from GameInfo will give you the from-scratch code base for you start developing your game, however deriving from UTGameInfo will give you a great stepping stone into creating your own game and it is what I will be using for this tutorial.
Deriving From GameInfo? What Do You Mean, Derive?
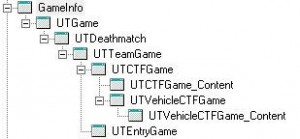
UnrealScript is a language that relies heavily on Object-Oriented Programming. Infact, every single .uc file contains one and only UnrealScript Class, which all derive from Object and a good lot deriving from Actor. When one class derives from another, it is said to inherit all of the traits, properties, methods, etc of the class before it. Lets take a look at the GameInfo hierarchy.
[caption id="attachment_221" align="aligncenter" width="300" caption="The GameInfo hierarchy as shown in UnCodeX. To learn more about UnCodeX, please watch this video tutorial."] [/caption]
The way the GameInfo hierarchy is laid out, one can make sense of this class deriving nonsense. If each class is a file of code, and each file of code inherits properties of the class above it, it is easy to figure out where code you need to create needs to reside. GameInfo is the super-class (the top-most class for its role) for all things game mode related. Below that is UTGame which derives from (also called extending) GameInfo to add more functionality to GameInfo for all of Epic's Unreal Tournament game modes. I will be extending from UTGame as it contains lots of code that you will have to rewrite if you were to extend GameInfo directly such as player HUD, input, deaths, etc. The next class in the hierarchy is UTDeathmatch, and this game mode is pretty simple. In fact its only 121 lines of code long as most of the game mode logic is done in UTGame as there are hardly any rules to Deathmatch as the goal is just to kill everyone else. Extending from Deathmatch is UTTeamGame which serves as the super-class for all game modes that have teams. In fact this super-class also functions as Team Deathmatch, as all UTTeamGame does is introduce team functionality. When you add team functionality to a Deathmatch mode, you get Team Deathmatch! The next class in the hierarchy is UTCTFGame, which adds Capture The Flag functionality. Capture The Flag is a team-based game, so it derives from UTTeamGame and contains code that stacks on top of just killing people, by adding flags to capture. There are two classes that extend from this however: UTCTFGame_Content and UTVehicleCTFGame. You will find that Epic sometimes splits their classes into two classes, one being for the class logic and the other being for setting up the "defaultproperties" block that handles a lot of content assignment. We will be getting more into more about the "defaultproperties" block later when we actually begin coding. UTVehicleCTFGame however does add something to the table, vehicles! There is no need to write a game mode from scratch just to include vehicles so once again we extend an existing class that just so happens to have CTF logic for us. Understanding how concepts like these are broken up and then implemented in class hierarchies is key to understanding UnrealScript and getting it to do what you want.
Okay, So How Do We Actually Derive/Extend?
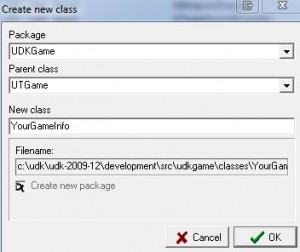
To make one class derive from another, we have to script it to do so! If you watch the video tutorial it will go over the many ways to first set this up, but for the written version of this tutorial I will be using UnCodeX's Create Subclass feature. You can do this manually yourself really easily, and that is also discussed in the video. To Create a Subclass (or extend a class/derive from a class):
-
Know which class you need to extend. In this case, it is UTGame
-
Navigate to the UTGame class in the Class Tree of UnCodeX
-
Right-Click it and choose Create Subclass.
-
If you already have a script package, choose it from the Package drop-down box. Otherwise, type in the name of your new script package. As previously mentioned, I will be using UDKGame.
-
Make sure Parent Class reads UTGame, as that is the class we want to extend.
-
Type the new name for your new GameInfo class. For this tutorial, I will be using UDKGame again, but if your game has a prefix (like UT for UnrealTournament) it would be wise to prefix your class name. You will see that I use HT in the future.
-
If you are just now creating your script package, make sure "Create New Package" is checked.
- After you click OK, it will ask where you want your base folder to be. Make absolutely sure to select your Src folder.
-
Click OK if you haven't already.
-
UnCodeX will attempt to open your new .uc file in a text editor, however if you have not set up an UnrealScript environment (as covered in my previous tutorial) Windows may ask you what program you would like to open it with. In which case, just use notepad.
-
If UnCodeX did not open your new class file, navigate to DevelopmentSrcYourScriptPackageClassesYourGameInfo.uc and open it there.
[caption id="attachment_223" align="aligncenter" width="300" caption="The Create New Class dialog in UnCodeX. User-Friendly way to extend a class if you are completely new to UnrealScript. See the video tutorial for more info about the power of UnCodeX."] [/caption]
Woah, My First UnrealScript Code, What Is This?
If you created your code with UnCodeX, the top portion of your code will consist of a comment block which you can feel free to keep/edit/delete/etc. Its a nice way to add a description of your class so that others reading your code can understand what it does/how to use it. Otherwise, if you followed the video tutorial or skipped ahead to this part directly, this is what you will have:
[csharp]class UDKGame extends UTGame;[/csharp]
Not too intimidating I hope, however UDKGame and UTGame may be different for you. You will always see a line of code similar to this at the very top of every UnrealScript code file. This line of code tells the engine and the compiler that this file** (which has to be named identical to the class you are declaring)** contains all the code for this specific class that you are now creating. The keyword "class" handles all that, but it has to be followed by the name of this new class itself. Remember, my new GameInfo class is named UDKGame, yours may be named different. The next keyword "extends" allows this class to extend or derive from another class, this one extending UTGame. Because of the fact that UDKGame extends UTGame, and UTGame extends GameInfo, UDKGame can be said to now be a GameInfo class. The last character on the line is very important: the semi-colon. Semi-colons are UnrealScript's (and most other languages) way to tell the compiler that this is the end of this line of code. Every instruction you do in code must be proceeded by a semi-colon. UDKGame is now ready to be used within the engine as your new game mode! Because this is the only line of code and adds no functionality, it will function identical to the UTGame class. As UTGame contains lots of logic already and that UTDeathmatch is hardly any improvement, Your game class is currently a UTDeathmatch-Lite! Save your file.
Getting the Engine To Use Your Game Mode
To have UDK use your game mode, there are two things you need to do:
- Tell the engine to load your package.
- Tell the engine to use your game mode.
Having the engine load your package
To have the engine load your package you will need to edit your config files that house all the settings and fun things the engine needs to load and to figure out what it is doing. The video goes more in-depth about the config folder, but here are some things to always keep in mind when editing a config file.
-
All your changes should only be done in the Default*.ini files, as those are the config files that will be set in stone when your game gets distributed.
-
Always delete all your UT*.ini config files unless you know you need them because you created them every time you make a change to your corresponding Default*.ini file.
-
If your changes did not seem to do anything, did you delete your UT*.ini files?
-
Also, you may want to delete your UT*.ini files and then reload it.
-
Lastly, if something is wrong, delete your UT*.ini files.
While that may be redundant, its pretty important if you change something and don't understand this concept. The Unreal Engine grabs configuration settings from the UTGameConfig folder. When developing your game, you have two sets of files: Default*.ini files and UT*.ini files. Also in the Engine folder you have Base*.ini files. The way the config system works is that first it loads the Base*.ini files, and then it loads the Default*.ini files and overrides any Base*.ini setting, lastly loading the UT*.ini files overriding any Default*.ini files. -
Base*.ini files: These are Epic's config settings for the engine. Don't touch them.
-
Default*.ini files: These are your config settings. These are the settings that will be standard when you distribute your game, and will override the Base*.ini settings when different. If these files are missing, they will be regenerated with the same settings in the Base*.ini files.
-
UT*.ini files: These are the end-user's config settings. These are settings that the players of your game will tweak and change to their liking. The end-user may even accidentally delete these files, in which case they will be regenerated with the Default*.ini files which they will have a tougher time corrupting. The reason why your changes are in the Default*.ini files is so that if a end-user screws up their settings, it will load your standard settings again. If you do all your editing in the UT*.ini files and the end-user screws up their config, they will need to re-install their game just to have proper config files!
Now with that said, lets delete those UT*.ini files.
After that is done, your UTGameConfig folder should have nothing but Default*.ini files. The one you need to open now is DefaultEngine.ini. This config file contains important settings that tell the engine what to do upon loading, some critical settings, and also which packages should always be loaded. Our game should always have our script package loaded as our game IS our script package. Epic made this really easy to add our new package in, as they just commented out the line that allows us to do so. Look for the following code block near the top of the config file:
[csharp firstline="31"][UnrealEd.EditorEngine]
EditPackagesOutPath=....UTGameScript
FRScriptOutputPath=....UTGameScriptFinalRelease
+EditPackages=UTGame
+EditPackages=UTEditor
+EditPackages=UTGameContent
;ModEditPackages=MyMod
AutoSaveDir=....UTGameAutosaves
InEditorGameURLOptions=?quickstart=1?numplay=1[/csharp]
Line 37 reads _;ModEditPackages=MyMod _and this is the line that will allow us to have the engine load our script package.
In config files, the semi-colon actually tells the engine to ignore everything past it, or to comment the line out instead of telling the engine that its at the end of the line of code. Right now that semi-colon is making the engine skip over ModEditPackages=MyMod. The ModEditPackages property tells the engine that our game ('mod') that we are developing is MyMod, which was the default name of the empty code folder the UDK made after install. You may or may not have changed this, in my case I changed it to UDKGame. By uncommenting this line out by deleting the semi-colon, and changing MyMod to our package name, the engine will now load our package and allow us to use our code.
My edited line:
[csharp firstline="37"]ModEditPackages=UDKGame[/csharp]
Save the file!
Seeing if the engine will now compile your package
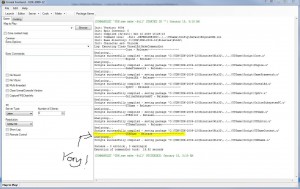
If the engine now is correctly loading your script package, it will be able to compile it through the Unreal Frontend. As I have written way above, it is convienent to have your Unreal Frontend running (located in your Binaries folder). The Unreal Frontend has a button on the top labeled "Make" along with a drop down arrow aside it that allows you to do a "Full Recompile". A Full Recompile will recompile all of your packages regardless if they have been modified or not since their last compile, while simply clicking the Make button itself will only compile packages that have changed. I recommend doing a Full Recompile right now to see if all of your other Epic packages are untouched and running just fine. In your compile log to the right, you will see a list of package names being outputted. If you see MyMod, UDKGame, or whatever you named your script package in the compile log then you have successfully made the engine load your package! Yay! If not, review the last section. Also, your compile should succeed with 0 errors and 0 warnings, otherwise you may have to review the 1 line of code we created earlier.
[caption id="attachment_232" align="aligncenter" width="300" caption="Seeing if our script package is now being compiled! Yay!"] [/caption]
Telling the engine to use your game mode
Now that the engine is now compiling your script package, your script package is now usable! Yaaay! This means we can tell the engine to use our new game mode as our default game mode! This couldn't be any easier. This is also done by editing a config file named DefaultGame.ini. Fitting, no?
[csharp firstline="4"][Engine.GameInfo]
DefaultGame=UTGame.UTDeathmatch
DefaultServerGame=UTGame.UTDeathmatch
PlayerControllerClassName=UTGame.UTPlayerController
GameDifficulty=+1.0
MaxPlayers=32[/csharp]
You will find this config block on line 4 of DefaultGame.ini. This here is pretty simple, we need to change the DefaultGame property and we are good to go. When we reference things in packages, be it static meshes, materials, particle systems, code classes, etc, we have to supply its fully qualified name. An assets' fully qualified name is in the form of PackageName.Group.Asset; but not assets have Group names. I will go into this more at a later time, but code classes are an example of an asset that does not have a group name in its fully qualified name. The name of the asset you will reference depends on how you named your script package and your GameInfo class. I used UDKGame for my package name and I also used UDKGame for my GameInfo, but they do not have to be the same and it is probably best if they aren't the same name. For me, my game's qualified name is UDKGame.UDKGame. Remember PackageName.AssetName, it is how everything is referenced.
My edited DefaultGame.ini line:
[csharp firstline="5"]DefaultGame=UDKGame.UDKGame[/csharp]
Save your file. Delete UT*.ini files before you test.
How To Test Our Game Mode
To test our game mode, we can't just load up our game with the Launch button in the Unreal Frontend. If we do this, our current config loads UTFrontend as our first level and this level has some special things going on behind the scenes that create the UI that allow the player to start a game of their choosing or join one. This level then loads another level that will be loaded with the appropriate game mode as we have not coded how our game mode handles itself on different maps. Loading a DM- map will load a UTDeathmatch game, a CTF- a UTCTFGame game, etc. We will fix this later on, but there is one map that we can load that does not have a prefix and also does not have any special game changing UI in our way: ExampleMap.udk. This ExampleMap is just that, an example map built with the UDK. We can load this map up by going to the Game tab in the top left and next to the Map To Play box, click Browse and select ExampleMap. Now when we click Launch, it will launch our game directly into that map! You may see a start up video along with a loading screen, but eventually you will be put right into ExampleMap!
Now how do we know its our game mode?
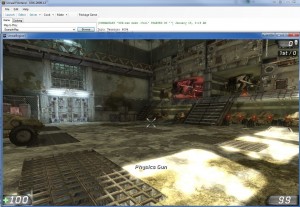
Well if you derived GameInfo, you won't have any weapons or HUD! That is a pretty significant change... but what if you derived from UTGame? If you examine the UTDeathmatch code, you will see that it doesn't add much at all to the UTGame class so UTGame and UTDeathmatch are near identical. Because our game mode derived UTGame and added zero code, our mode is identical to UTGame which is near-identical to UTDeathmatch. There is one easy difference to spot however, and that is UTGame gives players a Physics Gun whereas UTDeathmatch does not. If you examine the defaultproperties block in both UTGame and UTDeathmatch, you will see this difference at the end. We will go into this code block later however. Because UTGame gives us a Physics Gun and UTDeathmatch does not, and our mode is identical to UTGame, we should have a Physics Gun! To select it, scroll your mouse wheel! Then stand back, aim at the lone Scorpion, hold down right-click, and fling your mouse into the air! Yay Physics! If you find you do not have a Physics Gun, try deleting your UT*.ini files. If that doesn't work, review this tutorial.
[caption id="attachment_235" align="aligncenter" width="300" caption="Testing to see if your empty game mode is now being called and working by taking out the Physics Gun not available in UTDeathmatch. Yaay!"] [/caption]
