Beginning Your Game Part 2
Video Version
Subject: Beginning Your Game Parts 1 and 2
Skill Level: Beginner
Run-Time: 1 Hour
Author: Michael Allar
Notes: This is really incredibly long but goes over how to create a blank slate for your game. Also goes somewhat in-depth on a line-by-line basis.
Download: Low-Res (66MB) Hi-Res (200MB)
Written Version
Subject: Beginning Your Game Part 1
Skill Level: Beginner
Author: Michael Allar
Notes: Gets your UDK set up so that you can start coding into your own game class!
You will have needed to have done Beginning Your Game Part 1 if you are sticking to the written series of these tutorials. The video tutorial on both tutorials covers both parts.
Why Is There A Part 2?
So, we now have an empty game mode that we can now start coding into. Great! Why don't we start going over UnrealScript and start adding our own things?
Well simply put, we aren't done yet. While we have our own game mode set up now, we still are using Epic's player logic instead of a blank slate for us to use. The way the Unreal Engine handles player interaction is pretty important to understand:
- All physical representations of players, creatures, NPCs, and etc are coded in subclasses of the Pawn class. The term Pawn relates to how these 'actors' are essentially pushed around and have no mind of their own. The term Actor corresponds to anything the player may interact with in-world including things they don't know they are interacting with.
- All controlling logic that effects the physical representations of these actors are coded in subclasses of the PlayerController class. PlayerControllers possess and control Pawns. Example: The players input is sent to the PlayerController, which is then sent to the corresponding Pawn.
Right now we are using Epic's Pawns and PlayerControllers, when we should be using our own. You can continue to use Epic's code, but then you will only be able to create a game mode that only involves Epic's default player designed for UTDeathmatch. The point of Part 2 of this tutorial is to create our own PlayerController and Pawn classes, along with giving our game mode a little bit more functionality. There is more explanation of this in the video version of this tutorial.
[caption id="attachment_244" align="aligncenter" width="208" caption="The Pawn class listed in the class tree of UnCodeX. Ignore the crossed out class."] [/caption]
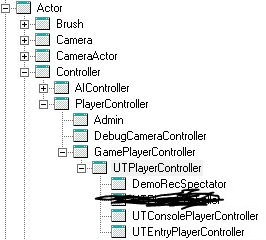
[caption id="attachment_245" align="aligncenter" width="266" caption="The PlayerController class listed in the class view of UnCodeX. Ignore the crossed out class."] [/caption]
As mentioned in Part 1, derived from these classes are GamePawn and GamePlayerController. You never want to derive from anything above a Game* class if one exists, as that will cause you to have to rewrite some engine functionality in your class. The Game* classes allow you to start with a clean slate but still giving your new subclasses the ability to be used in the engine correctly. This is where you have to make a choice similar to earlier however, whether or not you want to derive from the Game* classes or the UT* classes; deriving from the Game* classes will give you full control but deriving the UT* classes will speed up development for any type of game remotely near UT3 (read as: first person shooter). In this series, I will be deriving from the UT* classes and I -strongly- recommend you do too as well. If you chose to derive from GameInfo for your game mode you may do either here, but if you derived from UTGame then you should derive from the UT* classes here so code comparability is ensured and you know that you won't be missing code in your subclass that the UTGame class expects it to have.
Subclassing UTPlayerController
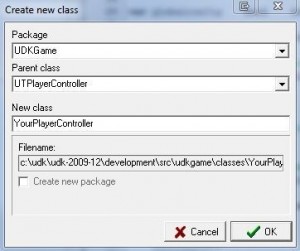
We can extend this class the same way we extended GameInfo in Part 1 of this tutorial. Be sure to use your script package.
[caption id="attachment_246" align="aligncenter" width="300" caption="Extending UTPlayerController in UnCodeX"] [/caption]
In this tutorial series, I will be using HTPlayerController as HT is a suitable prefix for a project that I am working on. Please name this something that suits your project, but remember that in this series I prefix all classes I create with HT (UDKGame being an exception). If you want to do this manually without UnCodeX, the video tutorial covers how to do this.
This results in the code asset UDKGame.HTPlayerController, or DevelopmentSrcUDKGameClassesHTPlayerController.uc. The directory structure of code packages should be clear now and I will only be referencing code classes from their packaged names here on out. The code generated should be as follows:
[csharp]class HTPlayerController extends UTPlayerController;[/csharp]
This line of code should make sense to you know, as it was covered in Part 1 and in the video version of this tutorial in-depth. Please review those sections if you do not understand this line of code.
Now we are going to introduce another keyword to our code, "config". In UnrealScript, if we give a class declaration the "config" keyword, we can have the engine create a config file for us that will allow us to change some of the settings of our class in a config file rather than having to open up our code and making changes that way. During development however, you should always make changes to your script files as the config settings are generally for allowing the end user to tweak the game to their settings. To use this config keyword, manipulate the code above to become:
[csharp]class HTPlayerController extends UTPlayerController
config(UDKGame);[/csharp]
This will allow us to make changes to our defaultproperties block of code through a config file, but we will cover this concept later. Also notice the placement of the semi-colon, it is now on the next line. The reason behind this is this code is actually one line of code, or one code instruction. Like in most languages, white-space does not matter too much so putting config on the 2nd line instead of the first is read the same way into the compiler, as long as UTPlayerController and config are seperated. Because the config keyword operates in the class declaration, the only reasoning for putting it on the next line is pure style and readability. Sometimes class declarations can have lots of keywords in it and its easier to read them line by line instead of reading them all in one line.
We need to create a defaultproperties code block for future use, so lets do that:
[csharp]class HTPlayerController extends UTPlayerController
config(UDKGame);
defaultproperties
{
}[/csharp]
I will go into the power of defaultproperties when we revisit our game mode class. For now, this will serve as a blank slate for us to add code to in the future.
Subclassing UTPawn
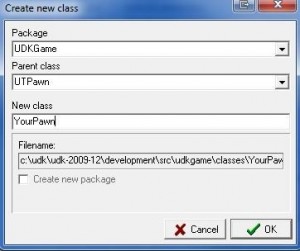
This is the third class we will be extending and we will just be creating a blank slate like before, so I won't go into too much info here.
[caption id="attachment_247" align="aligncenter" width="300" caption="Extending UTPawn in UnCodeX"] [/caption]
I will be naming my Pawn class HTPawn. Here is the blank slate code HTPawn will consist of:
[csharp]class HTPawn extends UTPawn
notplaceable;
defaultproperties
{
}[/csharp]
If you look at this code closely, you will see that I am not going to allow the HTPawn to be manipulated through a config file just yet, but also I have introduced a new keyword: notplaceable. The notplaceable keyword tells the Unreal Editor that this class can not be placed in-world, because we don't want it to be. Pawns are reserved for being only physical representations of players, AI, and etc. If you were to place a Pawn in a level, it will not have a PlayerController, any settings correctly configured, and will simply just not work. Pawns should be created either through code or through a factory class of some kind, which we will get into later. Currently Pawns are created by the UTGame class when the game mode decides it is time for a player to spawn.
Getting our GameInfo Class To Use Our PlayerController and Pawn
Now that we have empty slates for our PlayerController and Pawn, we need to get our game mode to use them! This is where we finally work with the defaultproperties class.
Every class in UnrealScript allows the use of a defaultproperties code block, which assigns variables values, inherits and overrides values of previous classes, and allows for manipulation of a class programatically through a certain extent. One example we have already encountered with this is the bGivePhysicsGun=true line in UTGame, which is overridden in UTDeathmatch by bGivePhysicsGun=false. The defaultproperties block is essentially a config file, which is why the defaultproperties block also does not have semi-colons to terminate each variable assignment. When you use the config keyword in a class declaration, you are giving access to this code block through a config file outside of the code. We will go over how config files work more in a later tutorial. The brilliance of the defaultproperties code block is that it allows easy changes to the behavior of inherited classes. I often recommend reading through the defaultproperties code block of a class you are reading for the first time first as it can give you an idea of what it does and what you can change just by the variables it exposes.
When you want to modify the default properties of a class, you can either change it in the class itself (only for classes you create yourself) or if you need to change an Epic class, you should extend it within your package and then modify the variables you need to there. This is what we are doing with our custom game info class. Right now our game info class looks like this:
[csharp]class UDKGame extends UTGame;[/csharp]
I am however going to add a little functionality to this so that it now reads:
[csharp]class UDKGame extends UTGame
config(UDKGame);
defaultproperties
{
}[/csharp]
You should already understand the changes I have made here.
Now to tell our game info class to use our PlayerController and Pawn, if you examine the defaultproperties block of what we derived from (UTGame.UTGame) you will see the following:
[csharp firstline="3591"]defaultproperties
{
HUDType=class'UTGame.UTHUD'
PlayerControllerClass=class'UTGame.UTPlayerController'
ConsolePlayerControllerClass=class'UTGame.UTConsolePlayerController'
DefaultPawnClass=class'UTPawn'
PlayerReplicationInfoClass=class'UTGame.UTPlayerReplicationInfo'
GameReplicationInfoClass=class'UTGame.UTGameReplicationInfo'
DeathMessageClass=class'UTDeathMessage'
BotClass=class'UTBot'
//And a lot more stuff in here....
}[/csharp]
Looking at the defaultproperties box of UTGame, you will see that there are some things that interest us. Those are lines are 3594 and 3596. 3954 reads PlayerControllerClass=class'UTGame.UTPlayerController'. The variable PlayerControllerClass holds a reference to a class that tells the game mode what PlayerController to use as the game modes PlayerController. It is then followed by the "class" operator. This allows us to say "Use this class" instead of "Use an instance of this class". This will make sense later when we deal with code assets vs. content assets in later tutorials, but we want all the PlayerControllers to be of HTPlayerController (or what you named your controller), not to all be the same instance of one HTPlayerController. Now within the quotes of the class operator, we feed it what class to use by giving it our code asset's fully qualified name. The fully qualified name of my PlayerController is UDKGame.HTPlayerController. This goes for DefaultPawnClass as well. DefaultPawnClass here does not use the fully qualified name here but just the class name; and while it will work in Epic's case it will not work in our case due to our code asset not being of the same scope. We will also talk more about scope later in a future tutorial. It is best to always use the fully qualified name anyways so that no one will be confused as to where your class lies if they were to read your code.
Now that we know what variables we want to change, lets change them! You can do that by making your game info class read:
[csharp]class UDKGame extends UTGame
config(UDKGame);
defaultproperties
{
DefaultPawnClass=class'UDKGame.HTPawn'
PlayerControllerClass=class'UDKGame.HTPlayerController'
}[/csharp]
Our game info class will now use our new Pawn and PlayerController classes! Whoooo!
You should be able to save your code, compile, and run your game. It will still load your game mode, but because our Pawn and PlayerController classes add no functionality, it will appear to function exactly the same because it technically is exactly the same! We just have some where to put our future code now.
Associating Our Game Mode With A Map Prefix
You may recall from earlier that if you load a DM- map it loads a Deathmatch game, a CTF- loads a Capture The Flag and a VCTF- prefixed map loads a Vehicle Capture The Flag game. How was this accomplished?
Once again, this magic is done in the defaultproperties code block of our game info class. If we dig back into the original defaultproperties box of UTGame:
[csharp firstline="3621"]DefaultMapPrefixes(0)=(Prefix="DM",GameType="UTGame.UTDeathmatch")
DefaultMapPrefixes(1)=(Prefix="CTF",GameType="UTGameContent.UTCTFGame_Content")
DefaultMapPrefixes(3)=(Prefix="VCTF",GameType="UTGameContent.UTVehicleCTFGame_Content")[/csharp]
Lines 3621 through 3623 fill in an array of variables that the GameInfo class uses to load a new game mode depending on the prefix of the map that was loaded. This lays it out pretty clear, DM loads UTGame.UTDeathmatch, CTF loads UTGameContent.UTCTFGame_Content, etc. In order for our map prefixes to load the correct game modes, we just have to override this in our game info class! While you may not understand everything going on in these lines, it is pretty obvious what we can change to get what we want.
[csharp]DefaultMapPrefixes(0)=(Prefix="HT",GameType="UDKGame.UDKGame")[/csharp]
In our game info class, we can add that line above to our default properties box to associate any map with the prefix with the HT prefix to use the GameInfo class UDKGame.UDKGame. Your names may be different but should match what you have done previously. If you have multiple game modes, you can set up the map prefixing logic here by adding a new map prefix data set by changing the 0 in DefaultMapPrefixes(0) to (1) just like in UTGame, and continue to 2, 3, 4, etc. We will go over arrays in a later UnrealScript tutorial.
Our code should now look like this:
[csharp]class UDKGame extends UTGame
config(UDKGame);
defaultproperties
{
DefaultMapPrefixes(0)=(Prefix="HT",GameType="UDKGame.UDKGame")
DefaultPawnClass=class'UDKGame.HTPawn'
PlayerControllerClass=class'UDKGame.HTPlayerController'
}[/csharp]
The UDKGame GameInfo class is the topmost GameInfo class in my project, and should be in yours too; therefore it has to be aware of all other GameInfo classes. This is why UTGame has prefix logic for DM, CTF, and VCTF. If we look in UTDeathmatch however, you'll see this is handled a little differently:
[csharp firstline="107"]Acronym="DM"
MapPrefixes[0]="DM"[/csharp]
The UTDeathmatch class is not going to transition into any other game modes, it will only transition back to the topmost UTGame class. There is no point in Unreal Tournament where you go directly from a UTDeathmatch to another game mode without some sort of middleman menu in between. Because of this, UTDeathmatch only needs to be aware of the prefix logic for itself. The Acronym variable tells the game mode what the game mode's prefix is. UTDeathmatch's prefix is DM, and is thus assigned to Acronym. Also, it adds DM to the map prefix logic as a game mode can have multiple prefixes which may or may not swap out game modes. Adding DM to the set of MapPrefixes allows UTDeathmatch to immediately switch to another DM map without having to worry what game mode it is. We already defined a map prefix for our game mode above, but we should at least let UDKGame know that its acronym is HT as well.
[csharp]class UDKGame extends UTGame
config(UDKGame);
defaultproperties
{
Acronym="HT"
DefaultMapPrefixes(0)=(Prefix="HT",GameType="UDKGame.UDKGame")
DefaultPawnClass=class'UDKGame.HTPawn'
PlayerControllerClass=class'UDKGame.HTPlayerController'
}[/csharp]
This will do for now. When we require a need to have a seperate game mode for menu front-ends, in-game madness, and other game modes we may create in the future, we may need to come back and rework or add to this code block. For now though, any map with the HT prefix (or the prefix you created) will always load our game info class, and thats all we need to make sure our levels run our game code!
After you save your code, it should compile with 0 errors and 0 warnings. Congratulations your game is now set up and ready for future code! Stay tuned for more tutorials on how to extend you game!
