Adding an M16: Part 2 – Geometry Rigging
Important Note:
During the video, I mention that all weapons point down the Y axis. I was basing this knowledge off of the Shock Rifle, which turns out is coded to be rotated to be facing down the X axis like the Rocket Launcher. Your model can face down any axis in 3DS Max, but make sure that after you import it that it faces down the X axis using the Rot Origin properties. You can leave it facing in the Y axis if you want, as adjusting the rotation in the weapon's code is also really easy to do too and I will go over how to do so in the code part of this tutorial series.
Video Version
Subject: Adding an M16: Part 2 – Geometry Rigging
Skill Level: Beginner
Run-Time: 21 minutes
Author: Michael Allar
Notes: Rigging a temporary M16 slug model to use for testing purposes.
Click here to continue to Part 2.5: Dummy Rigging (Optional)
Click here to continue to Part 3: Preparing Model For Implementation
Written Version
Subject: Adding an M16: Part 2 – Geometry Rigging
Skill Level: Beginner
Author: Michael Allar
Notes: Rigging a temporary M16 slug model to use for testing purposes.
Prerequisites: UDK, 3DS Max, ActorX
Making Your Model To Scale (In 3DS Max)
- Orientate the weapon so that it it points down the negative Y axis, with top facing positive Z. Y will be flipped when importing into UDK.
- Place the M16 at origin so that origin is at the weapons vertical center, horizontal center, and that its shifted forward or backward so the stock on the weapon is on origin or a bit behind it. This just makes first person view positioning a bit easier.
- Export your model as a .ASE (ASCII Scene Export)
- Import into Unreal and drop it into a level and see how the scaling works out.
- Go back into Max, scale, reposition, and re-export until the scaling is as desired.
Rigging Your Model Using Its Own Geometry (In 3DS Max)
Skeletal meshes can be imported from 3DS Max using geometry as their bones or by using actual bones, dummy objects, etc. The advantages of using geometry to rig are it is faster to do so, and all you have to worry about is the pivot points for each piece of geometry. The downside is that each piece of geometry can only be manipulated by one bone, being itself. This part goes over how to use geometry as rigging, however there is an optional tutorial on how to rig using dummy objects in 3DS Max as well.
- You should have one piece of geometry that will serve as the root node of the model. In this case, I used the main body of the M16.
- Use "Select and Link" to link objects to their parents. In this case, I only had to link my trigger to the main body.
Installing ActorX
ActorX is a plugin by Epic for 3DS Max, Maya, and XSI to export skeletal meshes for use with the Unreal Engine. There is a copy of the plugin to install inside your UDK installation under BinariesActorX. Install the plugin for your 3d package.
- For 3DS Max, grab the plugin from the Max folder that corresponds to the version of 3DS Max you are using and place the .DLU file into your Max installation directory in the "stdplugins" folder.
- Customize -> Plug-in Manager...
- Right-click anywhere in the Plug-in Manager and choose Load New Plugin...
- Open ActorX.dlu
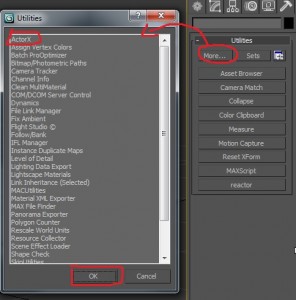
- Open the ActorX UI by clicking the Utilities tab on the right (hammer) and then by clicking More... Select ActorX and then click OK.
[caption id="attachment_259" align="aligncenter" width="296" caption="Bringing up the ActorX UI"] [/caption]
Exporting as a Skeletal Mesh (.PSK)
-
Choose a path and filename for your mesh.
-
Make your settings the same in the next picture:
-
If you do not have your mesh textured, uncheck "all textured".
-
Click Save mesh/refpose.
Importing Your Skeletal Mesh
-
Open your Content Browser
-
Import your file into a package of your choice.
-
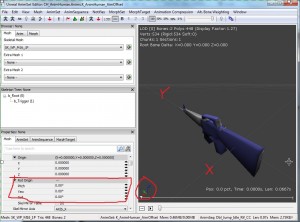
Make sure your model is pointing down the X axis.
- Open up the Skeletal Mesh Viewer by double clicking on your asset
Under the Mesh tab, adjust the Rot Origin properties until it does.
- Open up the Skeletal Mesh Viewer by double clicking on your asset
[caption id="attachment_261" align="aligncenter" width="300" caption="Where to set the orientation for your model."] [/caption]
Click here to continue to Part 2.5: Dummy Rigging (Optional)
Click here to continue to Part 3: Preparing Model For Implementation

