Setting up version control (Perforce) for Unreal Engine 4 using DigitalOcean and Ubuntu (Part 1)
A common question with Unreal Engine 4 (UE4) is "how do you set up version control?" I think this is a very important question and if you have never used version control for your projects you are crippling yourself from the start. I won't go into details about why you should use version control or how to use version control. I will be just covering how to get a basic setup going.
This is the first part of a two part post. This part will complete the setting up of the Perforce server but won't put your files on said server. For part 2, dealing with uploading files to the Perforce and setting workspace flags, click here.
Video Version
At ten minutes, this video will walk you through the process if you're completely unfamiliar with everything. If you know what a linux shell is, I highly recommend the condensed version down below.
Condensed Version
This should take you less than 60 seconds plus the time it takes for you get a 64-bit Linux server. Using DigitalOcean, this could be as little as two minutes.
If you are not interested in the specifics of how or why things work and are interested in a mostly automated process, or know enough about Linux/Perforce to just want the raw steps, then all you need is to do is run the following code on a 64-bit Linux host. If you don't have an Ubuntu 64-bit host, I recommend the $20/month tier at DigitalOcean, but you could get away with the $10/month tier if you wanted to. If you want more details about setting up with DigitalOcean, read the Creating a DigitalOcean Droplet section of this post.
Once you are connected to a 64-bit Linux host, run these shell commands. This will run my perforce installation script from my repo.
wget https://raw.githubusercontent.com/Allar/linux-perforce-installer/master/install-perforce
chmod +x install-perforce
sudo ./install-perforce
You will be asked to create a password and user details for a new user named perforce. Afterwards, the server will restart and you should then be able to connect to your Perforce server.
I highly recommend disabling user creation privleges, which you can read about here.
If you want more specific details about the process, the really long version is down below which does all the setup manually.
Long Version
There are many types of source control that exist in the wild but for game development, the most common being Perforce, Git, and Subversion. There are many differences between these source control systems and whether or not one is better than the other are endlessly debatable. UE4 has editor support for both Perforce and Subversion, but a community plugin for Git also exists, although I'm not too familiar with it.
I will be focusing on Perforce as I find that most game development houses use it, including Epic, and although it has the disadvantage of requiring a server, Perforce supports up to 20 users/workspaces free now and does a much better job at handling binary files than both Git and Subversion; better binary file handling meaningless server space required for revision histories.
This setup is more geared to those who build UE4 from source code but is also applicable for those who just want to host project files.
Perforce Hosting
Perforce is a centralized version control system, meaning it requires a server to be hosted on. You could run it locally and it is rather straightforward to set up, but I will be focusing on a more "proper" solution by setting up the Perforce host on a separate Ubuntu machine. If you plan to work with others remotely, I highly suggest renting a cloud server to put Perforce on so you don't have to worry about hardware maintenance, uptime, or bandwidth. There are a lot of server hosting solutions available, but for small projects, I highly recommend DigitalOcean.
Running a lightweight Perforce server using DigitalOcean will cost you $20 a month, ($10 a month if you know your project will be quite small) but if you are serious about development it will save you countless hours and cash when you inevitably break your project and need to revert some changes, or if you are working with someone else remotely.
If you do end up using DigitalOcean, please sign up using the links to it on this page as you get a $10 discount and I will get a much-appreciated referral credit. Other than this, I am not paid in any way by DigitalOcean and I genuinely love their service.
Creating a DigitalOcean Droplet
I will be writing how to set up a DigitalOcean Droplet, which is their term for a cloud instance, however this isn't absolutely required. I will be writing about how to set this up on a 64-bit Ubuntu/Linux system, so if you already have a Linux server up and running please skip this section. If you are installing a Perforce server on a Windows machine, using the server installer it is pretty straightforward and there's really nothing to write about.
- Create a DigitalOcean account by clicking Sign Up on the top right of this page.
- Confirm your account with the email that DigitalOcean will send you.
- Enter your credit card information or provide a payment upfront using PayPal. If using PayPal, I recommend a payment of $20 to get started.
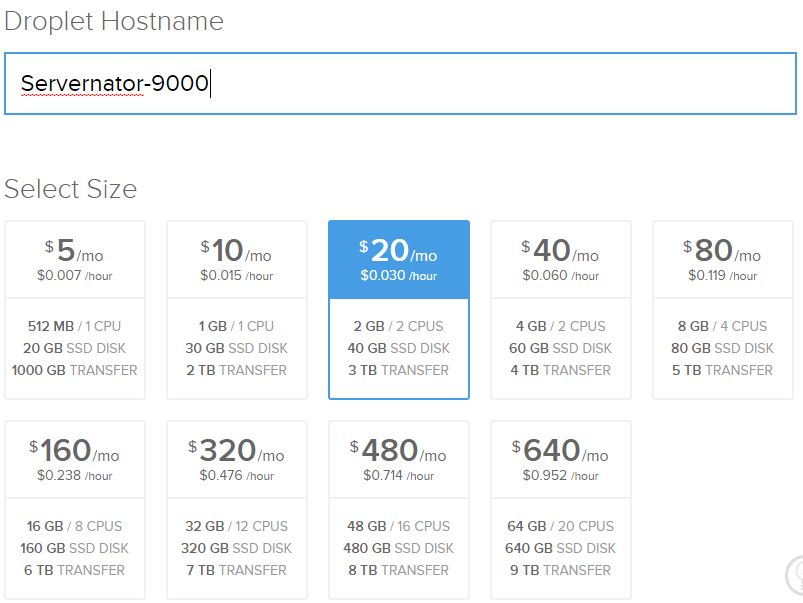
- Now you will need to create a droplet using the following settings.
- Hostname should be ideally be short
- I recommend the $20/month tier as it has enough space and bandwidth to last for a while for a small project and provides you with enough ram and cpu to run other server tasks such as issue tracking or a continuous integration system like Jenkins if you choose to in the future. You could get away with the $10/month tier though.
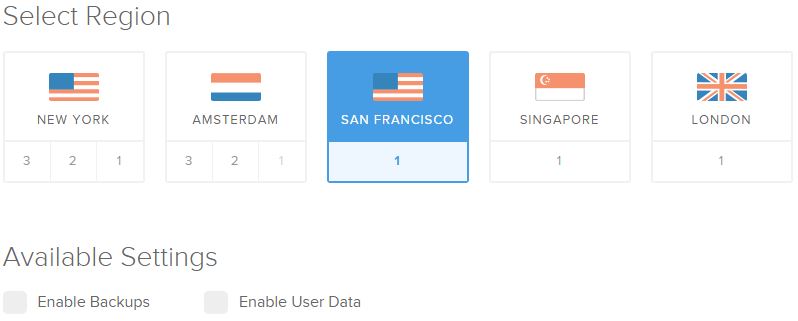
- Select the region closest to you for lower latency.
- You do not need any of the "Available Settings" unless you are interested in any of them.
Accessing your DigitalOcean Droplet
After you create your droplet, you will receive an email containing its IP address and credentials. You will need this to log in.
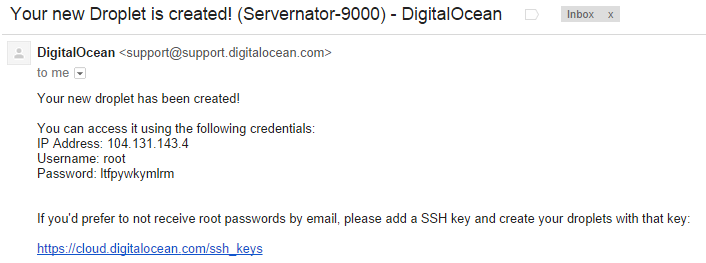
To access your DigitalOcean droplet you will need to SSH into it. Basically, this is a way to remote control a server but instead of seeing any form of user interface you can only interact with its shell/terminal/command prompt. The easiest way to do this is to download a program named PuTTY. On the downloads page, all you need is putty.exe. If you are on OS X, use this instead.
-
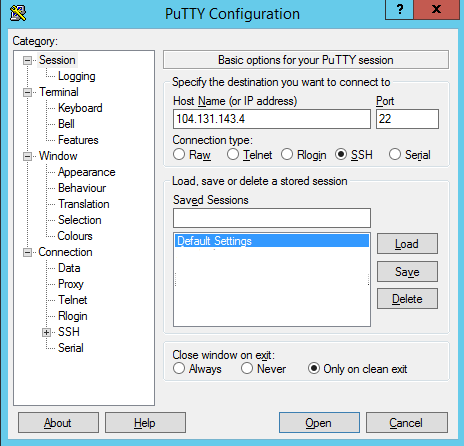
Once you load PuTTY, enter your droplet's IP address in the Host Name box and click Open.
-
A PuTTY Security Alert will pop up asking if you trust the host. Hit Yes.
-
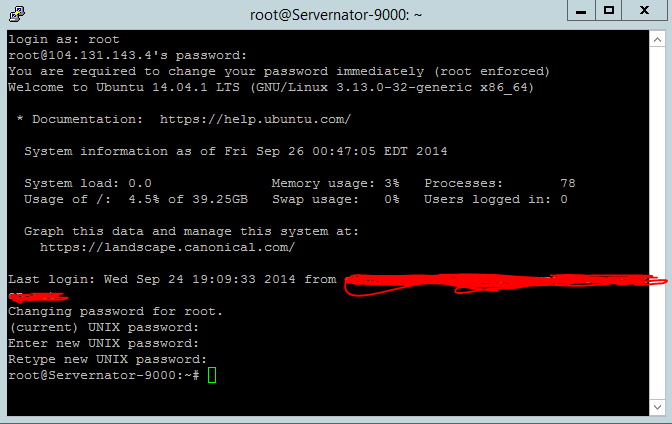
A shell will appear with the prompt
login as:. Type inrootand hit Enter. -
Type in your password given to you in the droplet email.
When you type in your password, no characters will appear, but rest assured your input is being sent. A shortcut you can use is if you put your password in your clipboard, you can right-click once to paste in the shell terminal and then hit enter.
-
DigitalOcrean makes it required to change your root password after your initial login. Enter your root password again, then enter a new password twice to change it. Be sure to remember this password.
-
If you end up at a prompt of
root@yourhostname:~#or something very similar, you are now logged in.
Installing Perforce Server
There are a lot of steps here that can be customized depending on your needs, but I will run through a standard basic installation.
Downloading Server Binary
The first step is to download Perforce Server. To find the latest version of Perforce, you can view all versions of Perforce here. As of this writing on September 25, 2014, the latest Linux 64-bit version is r14.1/bin.linux26x86_64 with download URL ftp://ftp.perforce.com/perforce/r14.1/bin.linux26x86_64/p4d. To download this on the server, we can use the shell command wget to... get it.
wget ftp://ftp.perforce.com/perforce/r14.1/bin.linux26x86_64/p4d
Enter the command above and your server should download the file directly.

Prepping Server Binary
Linux shells usually require an executable flag set on downloaded files if you want to run them. Ubuntu and Perforce are no exception. To make the file executable, use:
chmod +x p4d
Once the p4d server binary is executable, lets move it to /usr/local/bin
sudo mv p4d /usr/local/bin
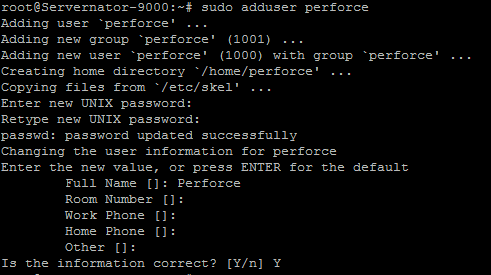
Setting Up Basic Permissions Security
It is highly not recommended that you run your Perforce server as root. root has far too much power and if someone were to run bad things through your Perforce server (which is highly unlikely), it should be isolated in terms of what it can do on the system. To do this we are going to add a new user.
sudo adduser perforce
This will prompt you to create a password and enter some details about the new user. These details are not too important and I just set the user's full name to Perforce.
Creating the Perforce Server Root
Now we need to create the directories that will house our Perforce server database files and logs. These files essentially store the settings of your server. We will also need to give the perforce user permission to use these files.
sudo mkdir /perforce_depot
sudo chown perforce /perforce_depot
sudo mkdir /var/log/perforce
sudo chown perforce /var/log/perforce
Installing Daemon
daemon is a Linux tool that turns a program into a daemon. A daemon is a background task that runs behind everything and isn't directly interactable. This is important as we want our Perforce server to always be running in the background, otherwise, if you start the server in your PuTTY shell, as soon as you quit your shell your Perforce server would also shut down. To install daemon, use the following command:
sudo apt-get install daemon
Setting Up Perforce As A Boot Daemon
We don't want to keep manually starting our Perforce server every time the DigitalOcean server goes down, even if the server will generally never crash or hang. If we need to restart the server for any reason, setting up Perforce as a boot daemon will make sure it will always be running. First, we need to go to the directory that has a bunch of system initialization controls.
cd /etc/init.d
Now we need a startup script for root which will launch a p4d daemon under the user perforce. I usually use this script for a while without any issue.
wget https://raw.githubusercontent.com/Allar/linux-perforce-installer/master/p4dservice
chmod +x p4dservice
Once you have the script saved, we need to update Ubuntu's boot process with it using the command:
sudo update-rc.d p4dservice defaults
Starting Up Perforce Server For The First Time
If everything is set up correctly, restarting the DigitalOcean droplet should boot the perforce server. To restart the server:
sudo reboot
PuTTY should close saying the connection has lost and your shell should become inactive. You should close it now.
Connecting To Your Perforce Server
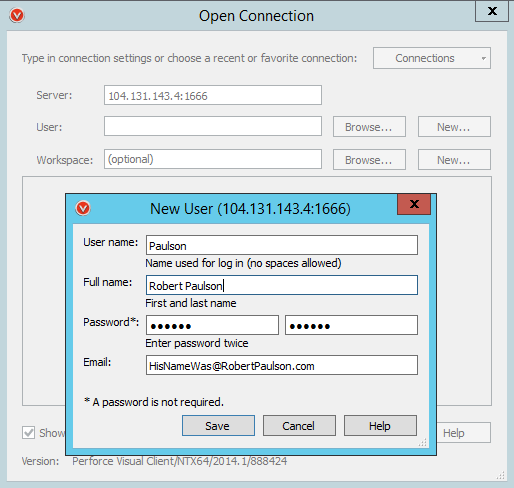
If everything went alright, your Perforce server should now be running. The easiest way to make sure its running is to connect to it from your workstation. To connect to your Perforce Server, you are going to need the Perforce Visual Client (P4V). You can download the client from the Perforce Downloads Page. Make sure you scroll down and are downloading the P4V: Visual Client. Go ahead and install the client with default settings. If you are prompted that the server localhost:1666 does not exist, go ahead and press on. At some point, you will be asked if you would like to run the Connection Setup Wizard. Hit No. If you hit yes, that's okay, but hitting No is faster. Just make sure that the following settings are correct, whether you are using the wizard or the Open Connection window.
Replace the IP address I am using with your DigitalOcean droplet's IP address
Server hostname: 104.131.143.4:1666
If using the Wizard, click Next and create a new user. If using the Open Connection box, click "New..." next to the User input box, and fill out your user details. I usually recommend your last name capitalized as your username if you are working with a team.
If using the wizard, click next, if using the Open Connection Dialog, click "New..." next to the Workspace input box. Your workspace name can be anything you want, however, if working on a team I highly recommend Lastname_Location, i.e. Allar_Home. Your location should match the root of your UE4 build or your UE4 project, depending on what you want on your Perforce server. If you are going to use a built UE4 from GitHub, its best if you have your projects you are working on along with your engine files, as laid out in my post about building UE4 from source code.
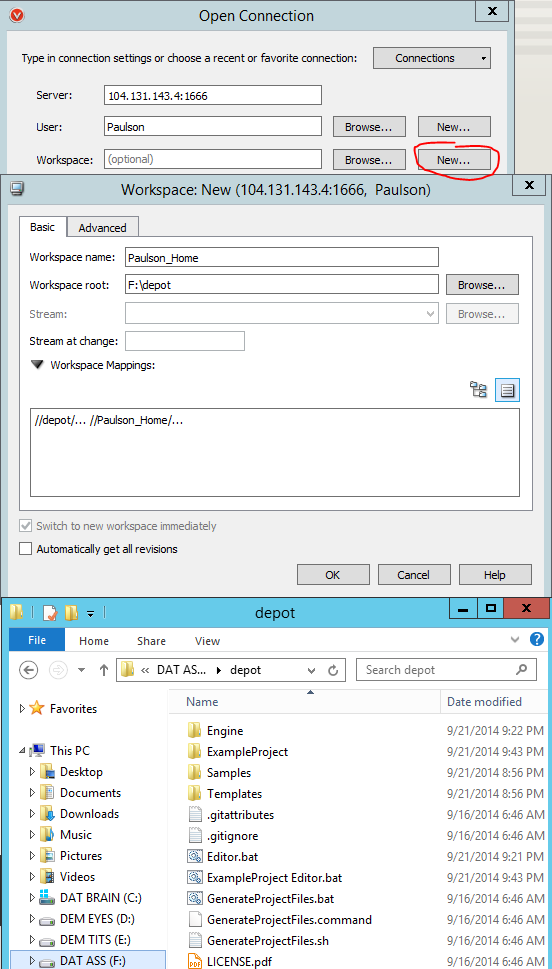
If you are using the Wizard, on the next page be sure to select "No, I will copy files to my workspace later". If you are using the Open Connection dialog, you may be asked if you want to choose a different location as the folder already exists. Hit No and then hit OK. If you are then prompted with an Add Files Wizard, hit Cancel.
Last Perforce Security Settings
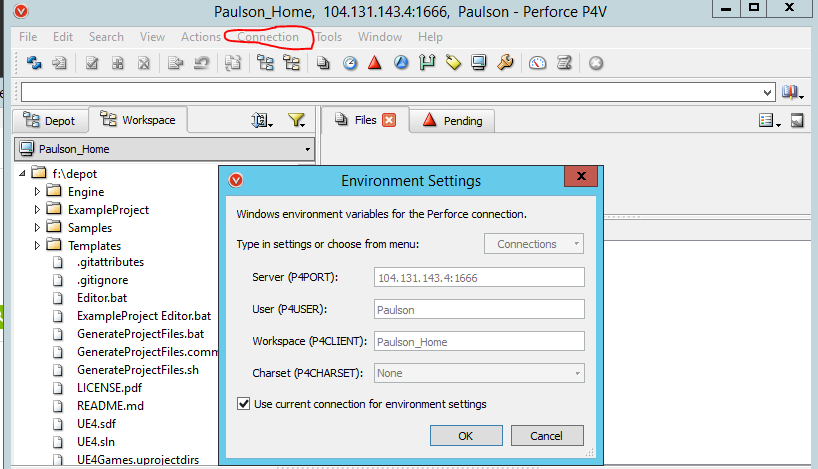
Ensuring Environment Settings Are Set
After creating this first user you should disable the ability for anyone to create a new user for your server. As you are the first user on your Perforce server, you have automatically been granted super user rights giving you full control over the server. As a super user, you can run most administrative commands without using PuTTY and through Perforce directly. To issue Perforce commands from your workstation, you first need to ensure your environment settings are set. The easiest way to set them is by using the client UI and navigating to the Connection menu at the top, then clicking on Environment Settings... Be sure that "Use current connection for environment settings" is checked and hit OK. After that, you can then use command prompt/terminal to issue P4 commands to the server your client is connected to.
Disabling User Creation
To disable user creation to everyone but yourself, open up Windows command prompt and navigate to your Perforce workspace directory. The easiest way to do it in Windows is to hold down shift and right-click in a folder view of your workspace, then choose Open Command Prompt Here.
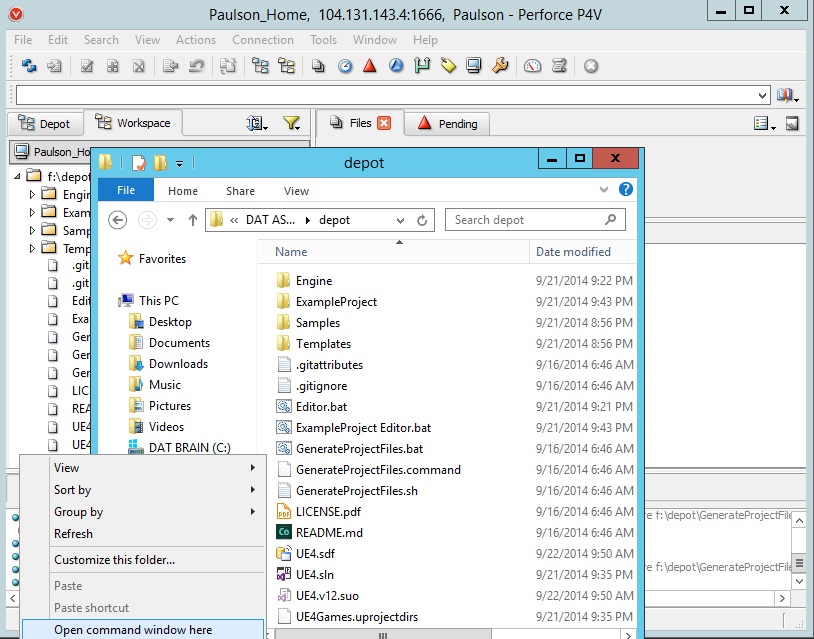
Once your command prompt or terminal is open, run the command:
p4 configure set dm.user.noautocreate=2
You should then be prompted with:
F:\depot>p4 configure set dm.user.noautocreate=2
For server 'any', configuration variable 'dm.user.noautocreate' set to '2'
This post has gotten pretty long, so I will separate the next part into a post of its own. The next section will be about which files to add to your Perforce server when using UE4 either built from source code or if you are just uploading your project files only.