How To Set Up Completely Insecure Samba Shares on Linux (Ubuntu Server)
This document describes how to set up completely open, absolutely insecure, fully accessible Samba shares on Ubuntu Server. This is incredibly useful for rapid deployment testing from a Windows machine to a Ubuntu Server target as a deployment can be then done with a simple robocopy or even a "drag and drop" within Windows.
WARNING: This will remove all pre-existing Samba shares on the server. This should only ever be used on Ubuntu Servers that are non-critical. The machines you use this on must be able to be nuked at any time. This should never be used on a public facing machine as then the entire world may have access to your Samba share and potentially other dangerous things. Use this when you know it is only you or only a trusted network can access this Samba Share.
Requirements
- A Linux Server you have full access to. This guide covers an Ubuntu Server but the instructions should be the same for most Linux distributions.
- Accepting responsibility for creating an insecure file share on your server
- Access to a shell on the server, whether its a local shell, or a remote one (i.e. PuTTY on Windows)
Automated Version
I wrote a script that will do this for you automatically. It will create a Samba share called Drop at /home/Drop. If you don't care where your shared folder is located or what it is named and just want an insecure Samba share, this is the method for you. Otherwise follow the manual instructions.
If you want to see the source of the automated version, it can be found here on my GitHub.
To do this automatically, log into a shell on your server, then execute the following lines:
wget https://raw.githubusercontent.com/Allar/automated-insecure-samba-share/master/automated-insecure-samba-share.sh -O automated-insecure-samba-share.sh
chmod +x automated-insecure-samba-share.sh
./automated-insecure-samba-share.sh
Your server should restart and you should have a Samba share named Drop ready to be accessed. See the end of this guide for details on how to access it.
Manually Setting up the Samba Share
1. Install Samba if it isn't installed already. This can be done with:
sudo apt-get install samba
2. Delete the default Samba configuration file.
sudo rm /etc/samba/smb.conf
3. Make a directory for your Samba share. I will be using the directory /home/Drop
sudo mkdir /home/Drop
4. As my created directory is outside my user directory, it had to be created by the root user (sudo does that for us). We don't want outsiders accessing the Samba share as root, so instead we'll make this directory accessible by the current shell user (assuming you are not logged in as root). Replace YOUR_USERNAME_HERE with your user name.
sudo chown YOUR_USERNAME_HERE /home/Drop
5. Begin editing a new Samba configuration file. Replace YOUR_USERNAME_HERE with the same user name you used in the previous step. Replace YOUR_SERVER_HOSTNAME_HERE with the hostname of your server.
[global]
guest account = YOUR_USERNAME_HERE
map to guest = bad user
workgroup = WORKGROUP
server string = YOUR_SERVER_HOSTNAME_HERE
security = user
name resolve order = hosts lmhosts
create mask = 0777
directory mask = 0777

[Drop]
path = /home/Drop
guest ok = yes
read only = no
writable = yes
public = yes
6. If you want to add additional Samba shares, copy paste the entire [Drop] definition and add it to the bottom of the configuration file. Then change [Drop] to [THE_NAME_OF_YOUR_SHARE] and path = /home/Drop to the path of your new share's directory.
7. Be sure to allow Samba access through your firewall. I'm using UFW here as it is pretty straightforward.
sudo ufw allow samba
8. Reboot the server.
sudo reboot
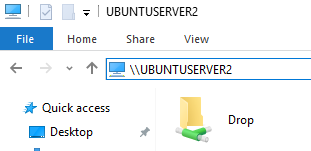
Accessing the new Samba Share
You should be able to access your Samba share in Windows under Network in any explorer window. If you do not see it, you can type in \\ServerHostName and you should see your new Samba Share and have full access without any form of credentials.