Populating Perforce With An Unreal Engine Source Build
This document covers how to set up a new Perforce server and populate it with an Unreal Engine source build alongside your projects. This is the most basic setup for 'beginner' Perforce pipelines and does not cover things like streams.
Please note that you should only do this if you specifically want to host your Engine source on your Perforce server. If you're looking to just host your project files, I suggest reading my older tutorials about this subject.
Perforce / Helix Name Change
So Perforce Software Inc. has recently changed their Perforce product name to Helix Versioning Engine. I will continue to refer to their software as Perforce and not as Helix because its Perforce damn it.
Clients
This tutorial assumes all clients are on Windows machines. For Linux clients, the steps will still work but you need to know the Linux command line equivalents.
Server Requirements
Storing the Unreal Engine on Perforce takes a lot of storage space. I recommend having at least 150GB, preferably 300GB or more for your Perforce server if you are going to be storing engine builds. At an absolute minimum, you will need 50GB but you will quickly run out of space afterward.
To save on Engine space, binary files such as .dll and .exe files will be limited to only storing their latest revision. This is because all binaries can be easily rebuilt from the stored source code.
Running a Perforce Server on Linux
I have an automated script that will install a Perforce Server on an Ubuntu machine you can use here. Otherwise, follow my old tutorial on how to get a server up and running, and come back to this tutorial when you have to create a user account.
Running A Perforce Server On Windows
- Download the Perforce Server (Helix Versioning Engine) installer.
- Install Perforce Server with all default options.
- If you are accessing this server from a different machine, make sure Windows Firewall allows Inbound Connections via TCP on port 1666.
Creating Your User Account
- Install Perforce Client (P4V) on a client machine with all default options.
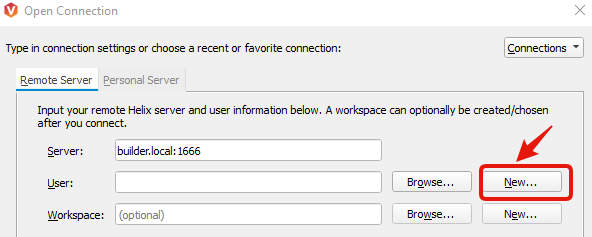
- Open a connection to the Perforce server. You are going to need to supply either an IP address or hostname of the Perforce server, and the Perforce server must be reachable from your client machine.
Enter your server's hostname or IP address in the Server field and make sure to include the :1666 port otherwise the client will fail to connect.
Because this is a brand new server installation, no users will exist. To create your user account, click the New... button next to the user field.
- Fill out your new user details and hit
Save...
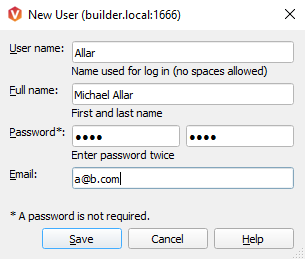
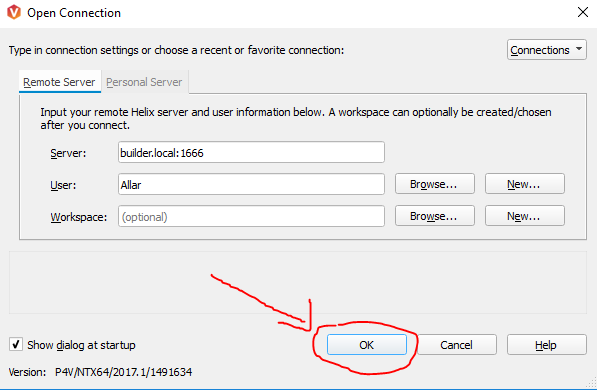
- Your new username should be shown in the User field. If not, type it in now. Be sure to choose a strong password that has at least 8 characters, one uppercase character, a number, and one symbol character to prevent errors at a later step. Then hit OK at the bottom.
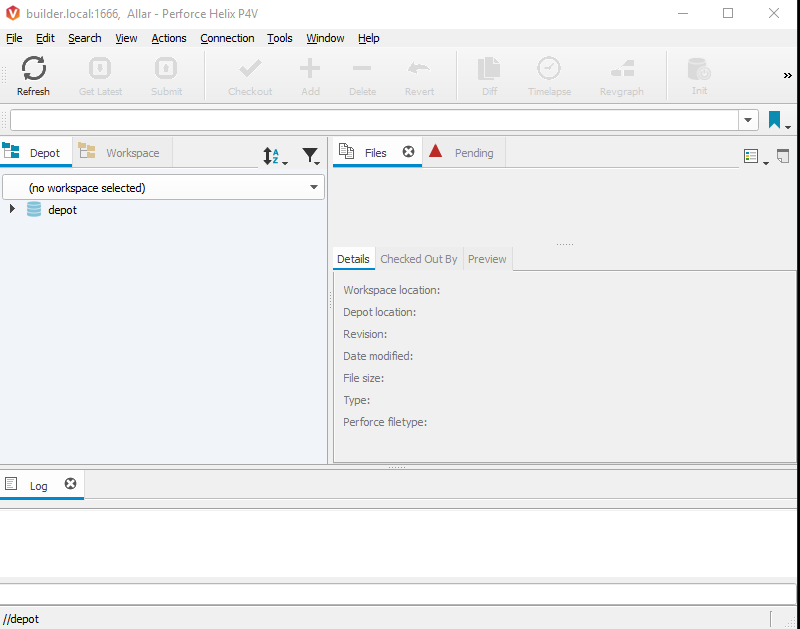
If everything was done right, you will then be greeted with this window. If you are prompted with a Wizard of any kind, simply close the wizard by hitting buttons such as Do Not Use Wizard or Close Wizard.
If you do not get the window in the following image, review the steps above again.
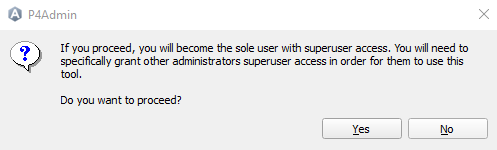
Designate You As SuperUser
- Login As
SuperUserby navigating to Tools->Administration. You will then be greeted withsuperuserconfirmation, so click yes.
Configuring Your Server
By default, user accounts do not need passwords and anyone can create an account. This is terrible behavior so we will address it.
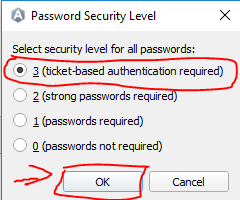
- Enforce User Account Passwords by going to Administration -> Password Security Level in the Administration tool Choose Security Level 3 and hit OK.
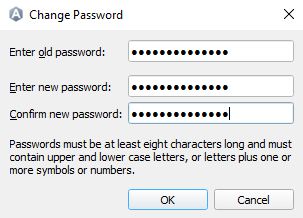
If you get errors after hitting OK, your password is not strong enough. Click through all the errors, then navigate to the User & Groups tab. Right click your user and choose Change Password.... Then proceed to change your password.
Disable Public User Account Creation
This is where it gets a little tricky.
-
Close the Administration Tool and go back to the Perforce Client.
-
Enforce Perforce Client Environment Settings by navigating to Connection->Enivronment Settings.. and then clicking
OKin the resulting pop-up box.

- Open up a Command Prompt by clicking the Start Icon and searching for Command Prompt.
Alternatively, hit Windows Key + R, type in cmd, then hit Enter.
- In the new Command Prompt, type the following and hit enter.
p4 configure set dm.user.noautocreate=2
You should see the resulting text:
For server 'any', configuration variable 'dm.user.noautocreate' set to '2'
If so, move on to the next step. If not, check your spelling of the above command and try again.
- Run the following command to disable unauthorized viewing of your Perforce user list:
p4 configure set run.users.authorize=1
You should see the resulting text:
For server 'any', configuration variable 'run.users.authorize' set to '1'
If so, move on to the next step. If not, check your spelling of the above command and try again.
- Run the following command to disable unauthorized viewing of your Perforce config settings:
p4 configure set dm.keys.hide=2
You should see the resulting text:
For server 'any', configuration variable 'dm.keys.hide' set to '2'
If so, you are done configuring the Perforce server and can close your command prompt. If not, check your spelling of the above command and try again.
Build The Unreal Engine From Source Code
Have a clean build of the Unreal Engine on your client machine. I recommend doing this in a clean folder with a very simple path, such as d:\415. We will be coming back to this later.
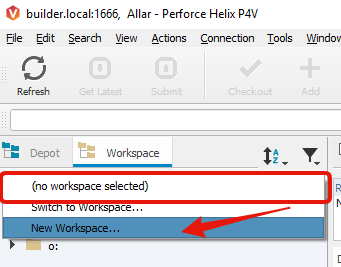
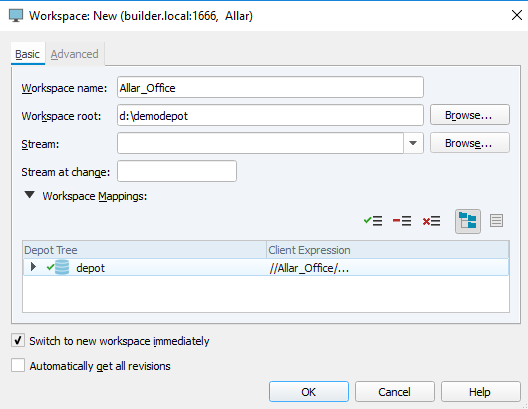
Creating a Perforce Workspace
A Perforce workspace is basically a local copy a project that you can work on while pulling updates and pushing changes to the Perforce server. You will have to do this for every client who is accessing the Perforce server.
To create a workspace, choose New Workspace from the Workspace drop-down.
We are going to create this workspace so that it is properly set up for working with Unreal Engine. The details of this are out of the scope of this guide, but using these settings will ensure a good workspace.
Workspace Settings
-
Your Workspace Name should be short and simple. I tend to use my last name followed by where this workspace is, such as Allar_Office.
-
Your Workspace Root should be also as short as possible. I prefer to use the path
d:\depot, but as I already have a depot there, for this guide I will used:\demodepot. -
Do not hit OK just yet, make sure your basic settings look something like this and then switch over to the Advanced tab.
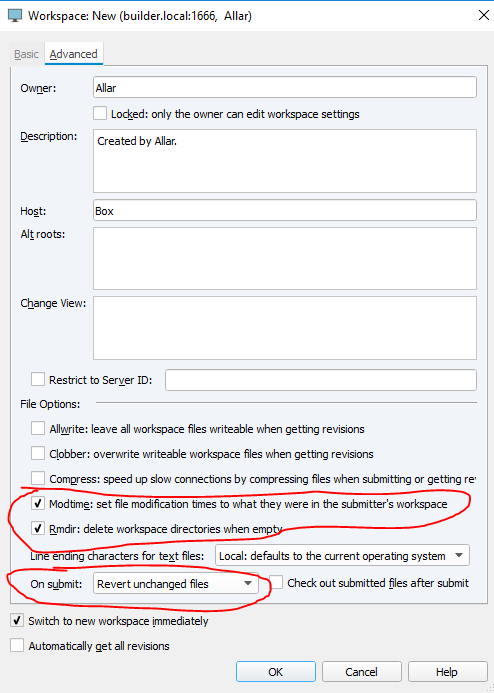
- Leave all the settings at default except change the ones circled here:
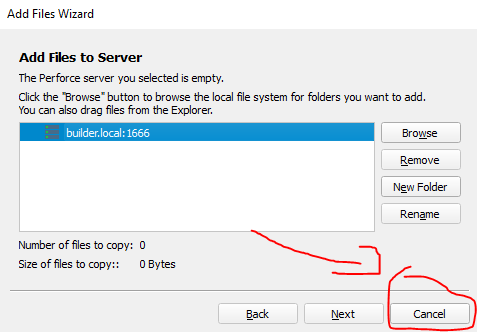
- You will be prompted with an Add Files Wizard, simply click
Cancelto dismiss it.
Set Up Perforce File Mappings
Perforce treats files differently based on their extension. For example, any code files are treated as text files that can be diffed, and any files it doesn't recognize are usually treated as binary files that only one person can check out and modify at a time.
It is really helpful to set up file mappings for Unreal Engine related files so that Perforce knows how to handle them correctly.
-
First, ensure your machine's environment variables are set by navigating to Connection->Environment Settings and clicking OK.
-
Then open a Command Prompt using the Start menu or by hitting Windows Key + R, typing in
cmd, and hitting Enter. -
In Command Prompt, enter the following command and hit Enter:
p4 typemap
Your text editor should load with a file that looks something like:
- Now replace the contents of that file with the following. Please note that if you set up your Perforce server so that your depot name is no longer
depot, please replace references todepotin the following text.
# Perforce File Type Mapping Specifications.
#
#  TypeMap:             a list of filetype mappings; one per line.
#                       Each line has two elements:
#
#                       Filetype: The filetype to use on 'p4 add'.
#
#                       Path:     File pattern which will use this filetype.
#
# See 'p4 help typemap' for more information.

TypeMap:
				binary+S2w //depot/....exe
				binary+S2w //depot/....dll
				binary+S2w //depot/....lib
				binary+S2w //depot/....app
				binary+S2w //depot/....dylib
				binary+S2w //depot/....stub
				binary+S2w //depot/....ipa
				binary //depot/....bmp
				text //depot/....ini
				text //depot/....config
				text //depot/....cpp
				text //depot/....h
				text //depot/....c
				text //depot/....cs
				text //depot/....m
				text //depot/....mm
				text //depot/....py
				binary+l //depot/....uasset
				binary+l //depot/....umap
				binary+l //depot/....upk
				binary+l //depot/....udk
Save and close the text file and your command prompt should print out:
Typemap saved.
If so, move on to the next step. If not, review the above steps and try again.
Set Up Ignore File
By default Perforce is going to want to have control over a ton of files it doesn't need and would, in fact, interfere with productivity. We can tell Perforce to ignore these files by using a .p4ignore file.
Creating The Ignore File
- Create a
.p4ignorefile.
To do this, open up Notepad and save a blank file with name .p4ignore inside your Workspace Root folder i.e. d:\demodepot.
- Then in Notepad, copy paste the following into this file and save it:
Saved/
Intermediate/
DerivedDataCache/
*.pdb
obj/
*.vcxproj
*.sln
*-Debug.*
FileOpenOrder/
Note: If you know you would like to keep .pdb files on the server, remove that line from the ignore text above.
Telling Perforce To Use This Ignore File
- Open up a Command Prompt and navigate to your workspace root.
If your workspace root, for example, is d:\demodepot, you can do this by entering the following command and hitting Enter:
cd d:\demodepot
If your workspace root is not on C, such as my example here, you will then need to run the following command, replacing d with your workspace drive letter.
d:
- Run the following command:
p4 set P4IGNORE=.p4ignore
If successful, this will not output anything. If it does output an error, review the above steps and try again.
Submitting The Ignore File
We are now going to submit our first file to the Perforce server, specifically this new ignore file. To do this...
- Find the file in the Workspace tree in the Perforce Client, right-click it, and click
Mark for Add...
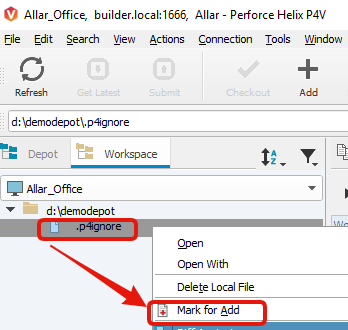
This will add this ignore file to our default changelist. Changelists are a list of changes that you've made locally that have not been submitted to the Perforce server yet.
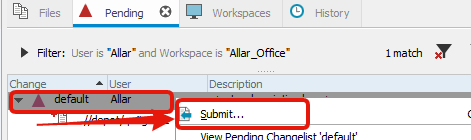
-
Find the default changelist in our Pending Changelists tab. If you do not see the Pending Changelists tab, open it by navigating to View->Pending Changelists.
-
Right-click the changelist and click Submit.
- Enter a description for this changelist such as 'Submitting Ignore File.' and then click Submit.
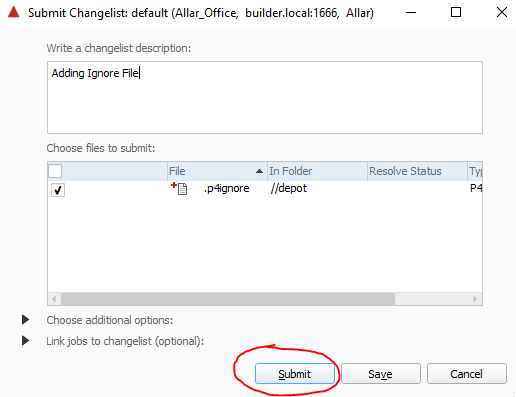
This ignore file is now stored on the Perforce server.
Putting The Unreal Engine Build On Perforce
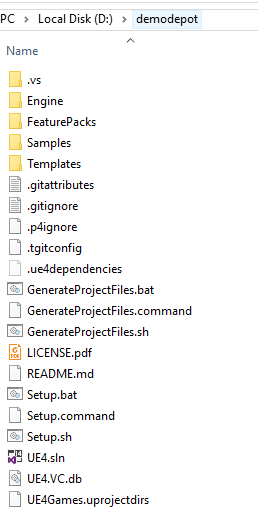
- Move everything in your build directory to your workspace. Your workspace root should look like this:
Testing The Ignore File
Before we submit the engine build to Perforce, we should make sure that our ignore file is being respected. If it is not working properly you will end up submitting a ton of files you do not need to your Perforce server which will cause many issues later on.
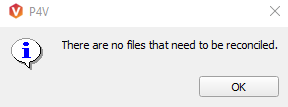
- Right-click your Engine\Saved folder in your Workspace Tree and click
Reconcile Offline Work...
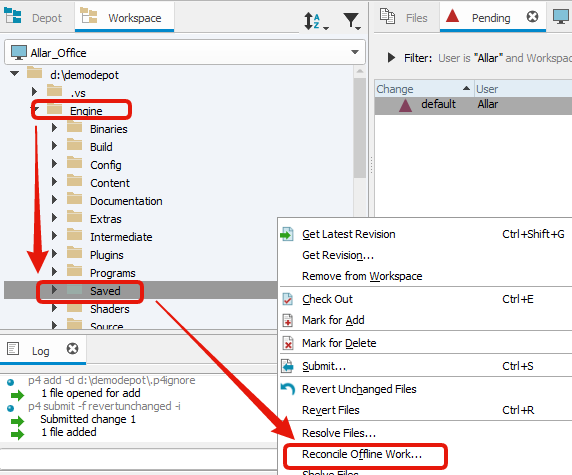
This should immediately prompt you with a window that reads 'There are no files that need to be reconciled.'. If this is the case, your ignore file is working properly and you can move on to the next step. If you see anything other than this, close the resulting window and review setting up the ignore file and try again.
- Click OK.
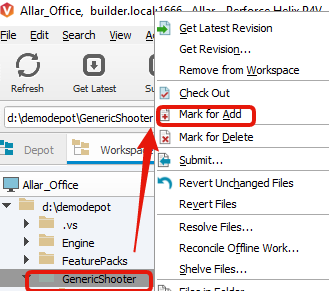
Submitting Engine files
- Right-click your workspace root and click
Mark for Add.

This is a very heavy operation and will take quite a lot of time. This will go through the roughly 110,000 files that make up the engine build, filter out any ignored files, and add them to your default changelist. During this time, the Perforce client might freeze up occasionally. Just let it take as long as it needs. You can tell the operation is still in progress by the cycling progress bar in the bottom right.
- Dismiss Ignored Files Warning if it pops up.
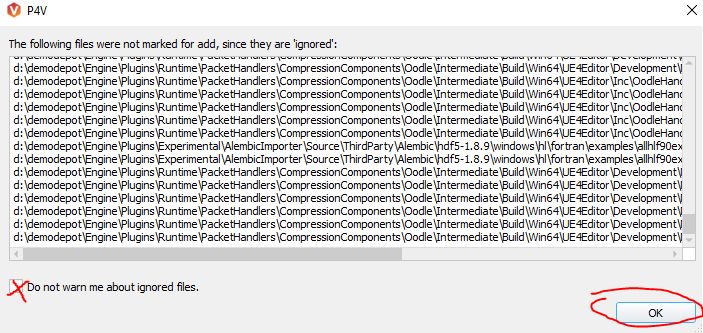
Perforce by default will warn you when files were ignored due to your ignore file for operations like Mark for Add. This is further confirmation your ignore file is working properly. If you do not want to see these warnings, check the box in the lower left before clicking OK.
- Add Files With Wildcards, Click Continue.
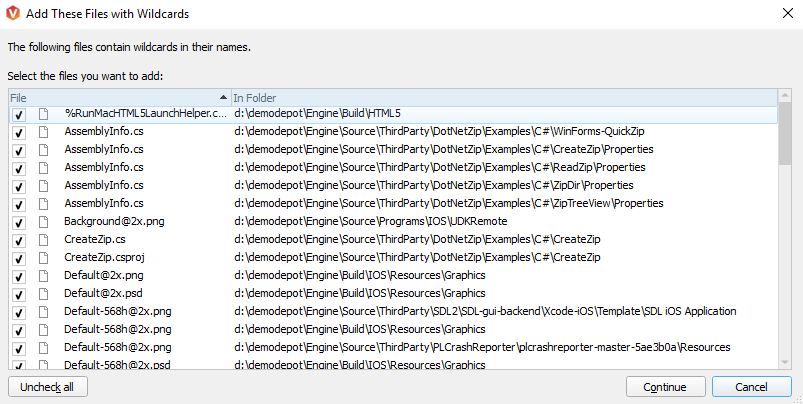
Epic has many files within the Unreal Engine that are considered to have 'wildcard' characters in their names. It is still valid to submit these files to Perforce but Perforce will ask if you want to do so. These files are usually only related to iOS parts of the Engine. Click 'Continue' here to add them.
- Right-click the default changelist, click Submit, and Submit the changelist with a message like 'Adding Engine files'
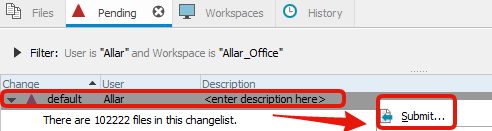
Just like how we submitted the .p4ignore file, submit our current default changelist. This will push all of the engine files to the server. This could take a really long time, so be prepared to wait here until it's done.
Using the Engine Build
You should be able to now use the engine build just as you would use any Unreal Engine built from source code.
Testing the Engine Build
A good way to test whether or not the engine has been submitted properly to Perforce is to create a new workspace on the same or different machine and see if you can build the engine without errors. When creating a workspace to use with this Perforce server, repeat the steps above in the section called Creating A Perforce Workspace, but be sure to use a unique workspace name. If you're creating a second workspace on the same machine, be sure to use a unique workspace root path.
-
Once a workspace is created, you can pull down the latest files on your Perforce server by right-clicking your workspace root and choosing
Get Latest Revision. -
To build the engine, run
GenerateProjectFiles.batas you would normally to generate your.sln, and then build using the.sln.
You do not need to run Setup.bat as all the files needed are now on your Perforce.
The engine should build with zero issues.
Submitting Engine Changes
Any time you make an engine change and want to submit new engine files, the easiest way is to right-click the Engine folder in the workspace tree and choose Reconcile Offline Work... which will look through all your Engine files and let you handle files that have been locally changed. This is the slowest way however as it has to look through all Engine files. Alternatively, you can check out the files you've changed manually.
Please note that you won't be able to change any source code files without checking them out, to begin with, or manually setting files to not be read-only. Checking out source files is the recommended way as that lets Perforce and everyone knows you are modifying those files. .dll, .exe, and other files are always writable however to make building the engine easier, so it is recommended that you run Reconcile Offline Work... unless you know exactly which binary files you need to submit.
Adding Projects To Perforce
When working with Unreal Engine built from source code, it is recommended to put your projects alongside the Engine. This is also the recommended way of storing them on Perforce as well, that way all your projects will always be in sync with your engine and vice versa.
-
Move your project to your workspace root alongside Engine.
-
Mark for Addyour project files.
- Submit your changelist with a message such as 'Added Project'.
Now your project will be stored on the Perforce server as well.